Wednesday, April 4, 2012

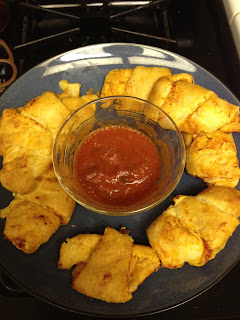
Cooking with Mama-Pizza Rolls

It's always a struggle to figure out what to do for dinner when daddy works. For those that don't know he is a Firefighter/Paramedic and works 24 hour shifts. So that leaves just K and I to cook for. I don't like making big meals since this is usually the time C is very clingy and fussy. So I am always on the look out for new simple dinner ideas. I have seen a TON of recipes on Pinterest using crescent rolls that I have been wanting to try. I LOVE crescent rolls and they are so east to cook. The other day I found a pizza crescent roll idea. K LOVES pizza, I LOVE crescent rolls. Win, win situation. We didn't copy it exactly, but adapted it to how we wanted to make them. I love having K help me in the kitchen. This recipe was so easy, she was able to make it almost completely by herself. With my supervision of course. Here is what we did.
Ingredients/Materials needed:
1 package of crescent rolls
1 bag of peperoni (optional)
1 cup of cheese of your choice (we used a mixed shredded cheese because we already had it at home)
1 cup marinara sauce
baking sheet
foil
*Preheat oven to temperature the crescent rolls pack calls for
*Line your baking sheet with foil. 
*Open pack of crescent rolls and unroll them on the backing sheet. Separate them into individual triangles.


*Spread marinara sauce onto each triangle.
   -side note: I often take left over sauce from a spaghetti, pasta, or homemade pizza meal and pour it into an ice cube tray. I then freeze them and put them in a freezer safe bag to store for later. I use them for times I need a small amount of sauce but don't want to open a whole jar. Examples-making a small serving of spaghetti for K only, making pizza with English muffins, and now this recipe!! Problem of wasting unused sauce solved!! If you are interested in more details on how I do this process, send me a comment or email and I will write up a post on it.


*Add peperoni and cheese to the triangles. Keep the pepperonis near the wide side so they don't fall out when you roll them up.
*Roll the crescent rolls like you would normally, according to the package. 
*Bake rolls according to package, or until they are thoroughly cooked and golden brown. Remove from oven and let them cool. Pour left over marinara into a bowl and serve!


These were sooooo soooo good. We ate them all and were wanting more haha! This will be going into our dinner rotation, even when Daddy is home.
A few things I learned along the way:
*Next time I will not add the marinara sauce. It just makes a big mess, and makes the rolls stick to the foil afterwards. I will just warm up a big bowl of marinara and use it for dipping.
*I will cut slices of cheese from a block next time. Only for the mere reason of convenience. Shredded cheese makes a mess and gets everywhere. It also makes the rolls stick a bit to the foil. The block cheese will allow you to easily choose the amount of cheese, a lot like we like it, or a small amount if you prefer.
You must try these if you are a pizza fan. You won't regret it!!
Pin It

Tuesday, April 3, 2012

Sticker Board Scene

I love that sometimes all it takes is a $1 to entertain K. While grabbing a few things at Walmart the other day, I happen to "stumble" upon the $1 bin. It's usually a hit or miss for me, but this time there was so much stuff, I wanted it all. But we (I) held our composure and picked out a few things. K picked out a few sticker scenes that they had. This did not surprise me as this girl LOVES stickers. So add to it that it comes with a board with a meaningful spot to put the pictures, SOLD!!! We got a sea life, Jungle animals, and Arctic animals. She did her first one the other day while I was playing on the floor with C. I love that is was simple enough for her to bring in on the floor so she could still be next to us hanging out. She loved it and she can't wait to make her other two. I highly recommend grabbing a few of these to have on hand. They are a big help to use if you need to keep the kids busy while you start dinner, feed the baby, road trips, doc appts, even grocery shopping. Best thing is, they are $1, just what this mama likes to hear.


Pin It

Tissue Paper Easter Egg

Yesterday K made an Easter Egg with tissue paper. Considering it's Easter in a few days, I figured we should do a craft or two. This was easy, simple, and fun, just my style!
Materials needed:
*Construction paper in any color you would like
*Assorted colors of tissue paper
*Glue
*Plastic Cup
*scissors
*Pencil
Trace the shape of an Easter egg onto the construction paper and have the child cut it out. Pour a small amount of glue into a plastic cup.

Next, lay out the tissue paper and have your child choose the colors they would like, and cut them into little squares. K chose to cut them out as she went along. You can have them cut all the squares out at once as well, whatever the child prefers. Again, I love child let activities and crafts, so I always take her lead. The only thing I will say is if you had a smaller child, I would probably have a pile of precut squares out for them. I would still have them practice cutting the squares, but I am pretty positive they will not have the patience to cut out as many squares needed for the egg.

Place one square around the end of a pencil. Dip the end into a cup of glue. Then press the pencil onto the egg and slide the tissue paper off. Repeat this until your child feels they are done decorating the egg.


In the pic above you can see a bunch of the tissue squares cut out. K asked me about 15 min into the craft, if I could cut out a bunch of squares for her because she was getting tired. No problem for me, it allowed me to participate a little bit with her. 
All finished!

Not only is this a fun craft, but you can use this to incorporate patterns and color recognition. You could draw sections and have them glue the tissue paper by color, per section. Or create AB, ABA, ABBA etc color patterns. I was very relaxed with K on this one. She is on Spring Break so we are giving her a little break from all the learning hoopla. K ended up giving this to Daddy as a Birthday present since his bday is the day before Easter. Daddy was very happy and loved it.

Pin It

Sunday, April 1, 2012

Magnetic Play

K decided she wanted to play with her magnet kits. Let me tell you, I was soooooo exited. I LOVE playing with magnets.  I have to admit, I bought the kit partly because I wanted to play with them. That and they were on clearance (SCORE!!!), and of course I knew K would love them and there are a ton of education value to magnets. Anyhow, I was so shocked when K didn't ask me to play with her. I asked her if she would like to create on her own and she said yes. I think I was more exited that she was so into playing with them by herself, that I wasn't bummed at all that I missed out on some magnet play. 
During her play time she explored areas such as patterns, imagination, color recognition, science, and shape recognitions.
Patterns- She used some of the magnets to create color patterns on her magnet board.
 -"Mom I made an A,B pattern look! Red, blue, red, blue"
Color Recognition- K identified all the colors of each magnet she played with.  She made sure I knew what colors she was working with.
   -" Look mom, I have a yellow magnet now"

Imagination- K had such great use of imagination by building a magnet person. How clever is her idea with the hair and face?


Science Lesson- The kit came with a magnet book. It talks about all the different magnets and how they work. Today K explored and learned about magnetic poles. In the book we read how opposite poles attract each other, and same poles repel each other. K had a lot of fun with experimenting the polar ends of different magnets. Her favorite were the magnet wands and horseshoes since they repelled the strongest.
We ran out of time before we could finish an experiment with pipe cleaners. We will be getting back to that in a few days and I will post about that as well. Magnets are so much fun for the kids, and adults too of course. There are so many versatile ways to play and learn. If you don't have one already, I would recommend investing in a kit. 

Pin It